How to Remove White Heat Spots from Wooden Tables
If you've recently acquired or refinished a wooden table, you might have noticed unsightly white heat spots marring its Surface. These marks, often caused by hot plates, cups, or humid conditions, can be quite stubborn. But don't despair, as there are several effective methods to remove them and restore your table's natural glow. Let's delve into the world of wood care, armed with simple, non-toxic, and effective solutions to tackle those pesky white heat spots.
White heat spots, or white rings, primarily occur due to the difference in moisture content between the affected area and the rest of the wood. When heat is applied, the wood's natural oils and moisture move away from the hot spot, causing a small, lighter area to form. The good news is, with a bit of patience and the right techniques, you can eliminate these marks and enjoy your table's full beauty once again.
Understanding Your Wooden Table
Before delving into removal methods, it's crucial to understand your table's wood type and finish. Different woods and finishes require unique care and treatment. If you're unsure, a quick online search or consultation with a local wood expert can_help you identify your table's wood type and proper finish. For now, let's discuss two common woods: hardwoods and softwoods, and some general tips for both lacquered and waxed finishes.

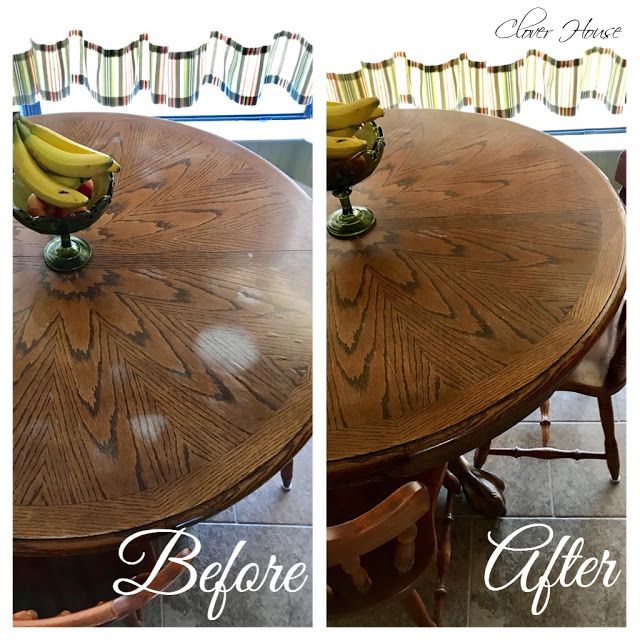

Hardwoods, such as oak, maple, or walnut, are known for their strength, durability, and stunning grain patterns. Softwoods like pine or cedar are lighter and often used in furniture construction. As for finishes, lacquer provides a tough, protective layer, while wax allows the wood's natural texture and color to shine through. Understanding your table's make-up will help you choose the best method to remove white heat spots without causing further damage.
Gentle Touch Method for Lacquered Finishes
If your table has a lacquer finish, you'll want to take a gentle approach to remove white heat spots. Lacquer is quite durable but can be susceptible to aggressive treatment like sanding or harsh chemicals. Start by wetting the affected area with plain water. If the white mark fades, great! If not, move on to the next step.


Mix a small amount of mild dish soap with water and apply it to the heat spot using a soft cloth or sponge. Gently rub the area in a circular motion, being careful not to apply too much pressure. Rinse with clean water and wipe dry with a clean, lint-free cloth. If the mark persists, repeat the process, gradually increasing the soap concentration if necessary.
Soft Buffing for Waxed Finishes
Waxed finishes require a different approach, as they are typically more delicate and sensitive to moisture. Begin by heating up some beeswax or a commercial wood wax using a double boiler or a microwave-safe container. Apply a thin layer of the melted wax to the heat spot, using a soft cloth or brush. Gently rub the wax into the wood using circular motions, taking care not to spread the white mark.
Let the wax sit for a few minutes, then buff the area using a clean, dry cloth. The idea is to нап-fill those moos oil and moisture, effectively 'erasing' the white heat spot. If the mark persists, repeat the process, ensuring the wax is warm each time. For more stubborn marks, you can create a paste using equal parts wood wax and swore turpentine, Apply, rub, and buff as before.
Ingredients and Tools for a Deep Clean
Sometimes, white heat spots require a more aggressive approach, especially if they're deeply ingrained or caused by long-term humid conditions. Fear not, as there are several non-toxic, household remedies that can help. Before attempting these methods, ensure you have the necessary tools and ingredients on hand:
• Fine-grit sandpaper (120 or 220 grit) • Steel wool or a wire brush (soft or medium) • Mineral spirits or denatured alcohol • White vinegar • Olive oil or mineral oil • Soft cloths or sponges • Paper towels or rags for cleaning up spills • A protective apron and gloves to safeguard your skin and clothes
Sanding and Oiling
For deeply ingrained white heat spots, sanding is often necessary. Begin with a fine-grit sandpaper, dampened with mineral spirits, and gently rub the affected area in the direction of the wood grain. Be cautious not to sand too aggressively, asthis can cause further damage and create new patterns in the wood's texture.
Once the white mark has faded, wipe the area clean with a damp cloth and mineral spirits. Allow the wood to dry completely, then apply a thin layer of olive oil or mineral oil, working it gently into the grain. Buff the area with a clean, dry cloth, and let it sit for a few hours or overnight. Wipe off any excess oil using a clean cloth, and marvel at your table's restored beauty.
Vinegar Soak and Wipe
White vinegar is a versatile, non-toxic cleaner that can help tackle stubborn heat spots, especially on woods with waxed or oiled finishes. Dilute white vinegar with an equal part of warm water, then soak a clean cloth or sponge in the mixture. Gently rub the affected area, using care not to spread the white mark. Rinse with clean water and wipe dry with a clean, lint-free cloth.
For more tenacious marks, create a paste using equal parts white vinegar and sea salt. Apply the paste to the heat spot, avoiding the rest of the table, and let it sit for 15-30 minutes. Gently rub the paste with a soft cloth, then wipe clean with a damp cloth and dry with a clean cloth. If necessary, repeat the process, reducing the vinegar concentration if the finish becomes too saturated.
By employing the right techniques and tools for your wooden table's unique needs, you can successfully remove those pesky white heat spots and restore your table's natural charm and luster. Regular upkeep and proper care will keep your wooden table looking stunning for generations to come. So, the next time you notice a white heat spot, don't despair; simply grab your supplies and bring your table's beauty back to life.
Related Articles
How to Remove Heat-Scorch White Spots from Wooden Tabletops
Are you tired of that unsightly white spot on your wood table that seemingly appeared out of nowhere? It's likely due to heat exposure. Wood is a hygroscopic...
How to Remove Heat Stains from Wooden Tables
Nothing can diminish the charm of a wooden table like heat stains. These unsightly marks can appear from hot pots, pans, or even mugs left unattended...
"Banish Hot Spots: Easy Ways to Remove Marks on Wooden Tables"
Have you noticed unsightly, discolored spots on your wooden table? These hot spots, often caused by heat or moisture, can detract from your table's beauty and...

How to Remove Ink from Wooden Table
Accidents happen, and if you've found yourself with ink stains on your beloved wooden table, you're not alone. But fear not, as these marks aren't permanent...

Restoring Wood Tables: Remove Nail Polish Stains with Ease
Ever accidentally used nail polish remover on your wooden table instead of that stubborn stain? Fear not, as it's a common mistake, and your wooden table can...

"Eliminate White Spots on Wood Table: Easy Homemade Solutions"
Have you noticed unsightly white spots or marks on your once-beautiful wood table? They can be caused by various reasons like water stains, heat exposure, or...