"How to Attach Rafters to Top Plate: Step-by-Step Guide"
Attaching rafters to a top plate is a crucial step in building a sturdy roof structure. It's a task that requires precision and attention to detail. In this guide, we'll walk you through the process, from planning to execution, ensuring you understand the intricacies of this essential carpentry task.
Before we dive into the nitty-gritty, let's clarify the key components of your roof structure: the top plate and the rafters. The top plate is the horizontal framing member that sits at the top of your walls, supporting the entire roof structure. Rafters, on the other hand, are the pitched roof members that run from the top plate down to the bottom plate or the ceiling joists.
Planning and Measuring
Precision is key in building a stable roof. Before you start cutting and attaching, you must ensure your rafters are the correct length and angle. Here's a step-by-step guide to help you with this:


- Measure the height and width of your walls. This will determine the length and angle of your rafters. Most rafters are cut at a 45-degree angle, but this can vary depending on your roof design.
- Mark the cut lines on your rafters. Using your measurements, mark where to cut the angle on one end of the rafter. This will be the top end that sits on the top plate.
- Cut your rafters. Use a saw to cut along your marked lines, ensuring you cut to the correct depth. Double-check your measurements before you cut to avoid wasting materials.

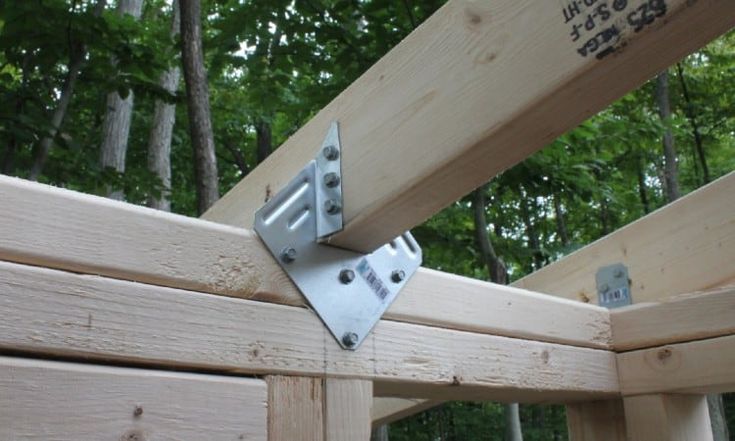
Understanding Rafter Spacing and Overhang
Additionally, don't forget to account for overhang when calculating your rafter length. The overhang is the distance between the outer wall of your building and the edge of the rafter. It provides protection for the exterior walls and looks more aesthetically pleasing than having the roof end abruptly at the wall.
Attaching Rafters to the Top Plate
Now that your rafters are cut to the correct length and angle, let's attach them to the top plate:
Marking and Positioning
Before you attach your first rafter, mark the position of each rafter on the top plate. This will help you maintain even spacing and ensure your rafters are perpendicular to the top plate. Using a framing square, draw a line from the corner of the top plate at a 45-degree angle. This line will mark the position of the first rafter.
Continue drawing similar lines along the top plate, ensuring the spacing matches your desired intervals (16" or 24" on center). These lines will act as your guide for positioning each rafter.
Attaching the Rafters
With your marks in place, you're ready to attach the first rafter. Here's how:
- Position the rafter on the top plate. Place the rafter against the wall and on the mark you made. The cut end should rest on the top plate, and the other end should rest on the wall plate or the ceiling joists.
- Secure temporarily. Use temporary braces or hurricane ties to brace the rafter against the top plate. This will ensure it doesn't move while you're attaching it.
- Measure and cut the bird's mouth. Mark the bottom end of the rafter where it rests on the wall plate or ceiling joists. This mark will guide you in cutting the 'bird's mouth' - a notch that allows the rafter to fit securely over the wall plate or ceiling joist.
- Cut the bird's mouth. Using a saw, cut along your marked lines, creating the bird's mouth. This will allow the rafter to sit securely on the wall plate or ceiling joist.
- Secure the rafter permanently. Once the bird's mouth is cut, remove the temporary braces. Using a drill, bore holes into the top plate and wall plate or ceiling joists. Insert 16d framing nails orletto bolts to secure the rafter in place. Ensure the nail heads or bolt heads are countersunk to avoid leaving sharp points that could puncture roofing materials.
Repeat this process for each rafter, ensuring they are evenly spaced and securely attached to the top plate. Remember, accuracy and precision are key in this task. A slightly off rafter could lead to a slab roof or other structural issues.
The importance of Splicing and Sistering
If your roof requires rafters that are longer than 20 feet, you'll need to splice or sister them. Splicing involves joining two rafters end-to-end, while sistering involves placing a new rafter alongside an existing one. Both techniques are vital in preventing weak points in your roof structure, which could lead to sagging or collapse under heavy loads or during harsh weather conditions.
When choosing to splice or sister your rafters, ensure you follow the correct techniques and local building codes. It's also recommended to consult with a professional if you're unsure about the process.
Congratulations! You've successfully attached your rafters to the top plate. This is a significant milestone in your roof construction project. Next, you'll need to add roof sheathing, rafter ties, and other roof components. Don't forget to follow up with a professional inspection to ensure your roof structure is sound and safe before proceeding with your roofing project.
Related Articles

How to Attach Rafters to Beam: A Step-by-Step Guide
Imagine you're building a dream home or a robust shed – at some point, you'll have to attach rafters to beams. This crucial step strengthens the structure's...

Mastering Hip Rafter Cuts: A Step-by-Step Guide
Cutting hip rafters, a critical step in constructing roof structures, requires both precision and understanding of carpentry principles. This guide will walk...

Sistering Roof Rafters: Step-by-Step Guide
Are you planning to replace an old, sagging roof on your home or perhaps have discovered rotting rafters during a recent inspection? Sistering a roof rafter is...

How to Attach Haakaa: A Simple Step-by-Step Guide
Attaching a Haakaa to your breast to express milk like magic? Here's how! First things first, ensure your Haakaa is properly sanitized. Once that's done, let's...

Boost Your Race: Step-by-Step Guide to Attach Pinewood Derby Car Wheels
So, you've decided to participate in a Pinewood Derby and want to know how to put wheels on a pinewood derby car? You're in the right place. We'll guide you...

"Effortlessly Attach Photos to eBay Messages on Android: Step-by-Step Guide"
Communicating with buyers and sellers on eBay is essential to building trust and completing successful transactions. If you're an Android user, you might find...