How to Draw a Line in Word for Resume
Crafting a professional resume is a crucial step in your job search journey. One key aspect that can set your resume apart is the clever use of lines to separate sections, draw attention to key information, or create visual hierarchy. In Microsoft Word, creating a line is surprisingly simple. Let's delve into how you can do this effectively to enhance the presentation of your resume.
Lines can be incredibly powerful tools in resume design. They can help break up text-heavy sections, subtly direct the reader's eye, or simply add a touch of visual interest. In this guide, we'll explore various ways to insert lines in Word and provide best practices to make your resume stand out.
Inserting Horizontal Lines in Word
Horizontal lines are perhaps the most common type of lines used in resumes. They can help section off different parts of your resume, such as your work experience, education, and skills. Here's how to insert one:


1. Place your cursor where you want the line to appear in your document.
2. Click on the 'Home' tab in the ribbon.
3. In the 'Paragraph' group, click on the 'Borders' button and choose the 'Horizontal Line' option.
4. Select the style and width of your line. We recommend using a thin, single line style for your resume.
Adjusting Line Thickness and Style
Word offers a variety of line styles and thicknesses. While it might be tempting to use a thick, decorative line, remember that your resume should be clean and professional. Sticking to thin, solid lines is the safest bet. Here's how to adjust your line:
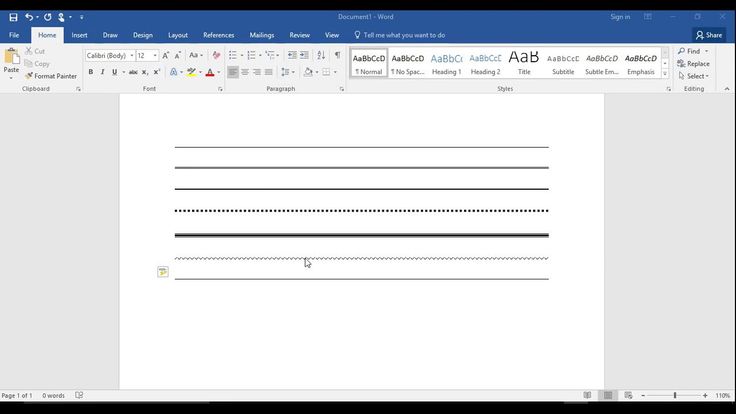

1. After inserting your line, click on it to highlight it.
2. In the 'Home' tab, click on the 'Borders' button.
3. Choose the line style and width from the dropdown menus.
Creating Dashed or Dotted Lines
For a more subtle separation, you might want to use dashed or dotted lines instead of solid ones. Here's how to create these:
1. Follow the steps above to insert a horizontal line.
2. After selecting the line, click on the 'Borders' button again.
3. In the 'Settings' section, choose 'Dashed' or 'Dotted' from the 'Style' dropdown menu.
4. Adjust the width to your preference.
Using Line Breaks for Hierarchy
While not exactly a line, line breaks can also be used to create visual hierarchy in your resume. They can be particularly useful for separating different types of information within a section, such as the date and description of a job. Here's how to use them:
After typing or pasting your text, press 'Enter' on your keyboard to create a line break. You can also use the 'Line Break' button in the 'Paragraph' group of the 'Home' tab. To adjust the spacing before or after the line break, use the 'Line Spacing' option in the 'Paragraph' group.
Combining Lines and Text for a Modern Resume
For a more modern look, you might want to combine lines with text. This can be achieved by placing a thin, horizontal line immediately above or below a line of text. Here's how to do this:
1. Type or paste your text.
2. Place your cursor where you want the line to appear.
3. Follow the steps above to insert a horizontal line.
4. Use the 'Line Spacing' option in the 'Paragraph' group to adjust the space between the line and the text.
Andrew's Top Tip: Using Tables for Complex Layouts
While lines can do a lot to improve the visual appeal of your resume, they can quickly become unwieldy when dealing with complex layouts. For these cases, consider using tables. Here's how to insert a table in Word:
1. Place your cursor where you want the table to appear.
2. Click on the 'Insert' tab in the ribbon.
3. In the 'Tables' group, choose the number of columns and rows you need.
4. Once you've inserted the table, you can adjust its size, borders, and style as needed.
Creating lines in Word is a simple yet powerful way to enhance the visual appeal of your resume. By using lines strategically, you can draw the reader's eye to key information, create a sense of hierarchy, and make your resume stand out. So, go forth and start creating those lines! Don't forget to proofread your resume multiple times to ensure it's error-free and well-formatted. Happy job hunting!
Related Articles

Step-by-Step: Insert Lines in Word for a Professional Resume
Formatting your resume is crucial for making a strong first impression. One of the most common formatting elements on a resume is the use of lines, which can...

Mastering Paper Craft: Draw Grass Realistically - Step-by-Step Guide
Have you ever wanted to bring a touch of nature into your craft projects or artwork, but found that real grass can be fragile and مثلاً light-sensitive? Well...

Mastering 3D Word Illustrations: A Comprehensive Guide
Have you ever wanted to add depth and dimension to your hand-lettered designs? mastering the art of drawing words in 3D can transform your typography, making...

Mastering Straight Line Duplication: A Comprehensive Guide
Creating straight lines in Procreate, the powerful digital illustration app for iPad, can seem daunting at first, but with the right techniques and tools, it's...

How to Indent Second Line of Bullet in InDesign
When it comes to document design, consistency is key, and this includes the formatting of bullet points. In Adobe InDesign, creating an indent for the second...

Create Stunning Word Cover Pages: A Step-by-Step Guide
Creating an impactful cover page is the first step in making a strong impression with your document. Microsoft Word offers a variety of user-friendly tools to...