How to Install Slate Roof: A Step-by-Step Guide
Embarking on a roofing project can be a rewarding home improvement venture, and installing a slate roof is a high-end choice that adds beauty, durability, and value to your property. Slate roofing is renowned for its timeless appeal, resistance to weathering, and longevity, with some slates lasting over 100 years. This comprehensive guide will walk you through the process of installing a slate roof, from gathering materials to securing the final tiles.
Preparing for Installation: Tools, Materials, and Safety
Before beginning your project, ensure you have the right tools and materials at your disposal. Safety is paramount when working at heights, so always wear appropriate personal protective equipment (PPE) and follow safety guidelines.
Required tools and materials include:


- Slate tiles
- Synthetic or copper roofing felt
- Roofing nails (galvanized or copper)
- Roofing cement
- Hammer, utility knife, and trowel
- Roofing nail puncher
- Chalk line and measuring tape
- Safety harness and fall protection equipment
Selecting Quality Slate Tiles
Investing in high-quality, natural slate tiles is crucial for a durable and aesthetically pleasing roof. Consider factors like color, texture, and warranty when choosing your tiles, and always buy from a reputable supplier.
For peace of mind, opt for slate tiles rated according to ASTM standards, which provide guidelines for thickness, durability, and other key factors.


Preparing the Roof Surface and Underlayment
Before laying the slate tiles, prepare the roof surface by removing any existing shingles, nails, and debris. Ensure the roof decking is solid, clean, and free of defects. If necessary, replace any rotted or damaged boards.
Once the roof surface is prepared, install a layer of synthetic or copper roofing felt as an underlayment. This crucial step helps protect the roof from moisture and provides additional support for the slate tiles.
Laying the Slate Tiles: Step-by-Step
With the underlayment in place, you're ready to begin installing the slate tiles. Start from the bottom of the roof, working your way up to the peak to ensure proper water runoff.
For optimal results, stagger the tile joints both horizontally and vertically, ensuring no two tiles align in either direction. This technique promotes better waterproofing and a more attractive appearance.
Securing the Slate Tiles
Begin with a full tile at the bottom edge of the roof, and work your way up using a combination of full and half tiles. Once a tile is in position, secure it with two evenly spaced roofing nails punched through the nail holes pre-drilled in the tile.
Use a roofing nail puncher to create precise holes for the nails, ensuring the tile is not damaged during installation. Apply roofing cement to the nail heads after they've been set to prevent water from seeping underneath the tiles.
Addressing Valleys, Ridges, and Chimneys
Installing slate tiles around valleys, ridges, and chimneys requires specialized techniques to ensure proper waterproofing and structural integrity.
For valleys, use a valley metal underneath the tiles to promote water runoff and prevent leakage. For ridges and chimneys, install flashing materials like aluminum or copper to create a watertight seal between the tiles and the penetration.
Finishing Touches and Maintenance
Once the main section of the roof is complete, install drip edges and step flashing at the eaves, gables, and rakes to prevent moisture intrusion and protect the roof's edges.
The final touch is to install a hip and ridge cap system, which provides an attractive and functional finish to the ridge and hip lines of your roof. Opt for cap materials that complement your slate tiles and offer excellent weather resistance.
Regular Inspections and Maintenance
To keep your new slate roof in top condition, perform regular inspections and address any potential issues promptly. Look for signs of damage or wear, such as broken tiles, missing nails, or deteriorated flashing, and repair them as needed.
slate roofs require minimal maintenance, but periodic cleanings can help prolong their lifespan and maintain their appearance. Gently remove dirt and debris using a soft-bristle broom or pressure washer, taking care not to damage the tiles.
Embracing the timeless elegance of a slate roof is a wise investment in your home's curb appeal, value, and longevity. With proper installation and maintenance, your new slate roof will provide generations of protection and beauty for your most important asset – your home.
Related Articles
Step-by-Step Guide: How to Install a Slate Roof
Installing a slate roof can significantly enhance your home's curb appeal and durability, with slate tiles lasting up to a century. This comprehensive guide...

How to Install Thule Roof Box: Step-by-Step Guide
Streamlining your journey, transporting more in your vehicle just got easier with Thule's roof boxes. They offer generous cargo space, aerodynamic design, and...
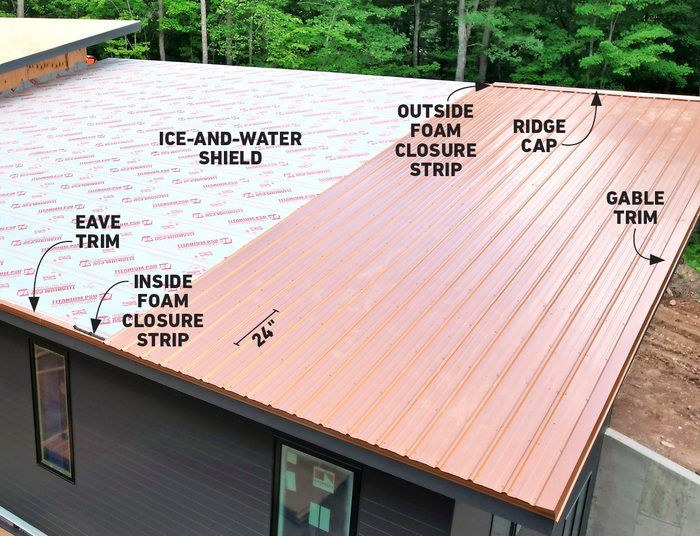
How to Install Metal Roofing on Flat Roof: Step-by-Step Guide
Transitioning your flat roof to metal can significantly boost durability and longevity, but the process demands careful planning and expert execution. This...

"Mastering Thule Roof Rack Installation: Step-by-Step Guide"
Installing a Thule roof rack is an excellent way to expand your vehicle's cargo-carrying capacity, making it perfect for road trips, moving, or hauling...

Mastering Roof Insulation: A Step-by-Step Installation Guide
Embarking on a roof insulation project? You're on the right track to a more energy-efficient and cozy home. Installing insulation in your roof is a rewardingly...

How to Install Yakima Roof Rack: Step-by-Step Guide
Elevate your vehicle's cargo capacity with a sleek and secure Yakima roof rack. Perfect for carrying kayaks, skis, bikes, and loads more, a Yakima roof rack is...