How to Draw a Black Hole Step by Step
Ever since the groundbreaking image of a black hole was captured by the Event Horizon Telescope in 2019, our fascination with these celestial phenomena has only grown. As intriguing as they are, black holes aren't restricted to the realm of astrophysics alone - you can explore their mesmerizing nature through art. Here, we'll guide you through drawing a black hole step by step, using simple tools and basic techniques.
Before we dive in, let's clarify that there's no single 'right' way to draw a black hole. The beauty of art lies in its subjectivity, and this guide reflects one approach among many. So, grab your pencils, and let's embark on this cosmic adventure.
Preparation and Understanding the Fundamentals
Drawing a black hole begins with grasping its basic principles. Black holes are regions in space where the gravitational pull is so strong that nothing, not even light, can escape. They appear as a black disc against a backdrop of stars and galaxies. So, let's start with the basics:
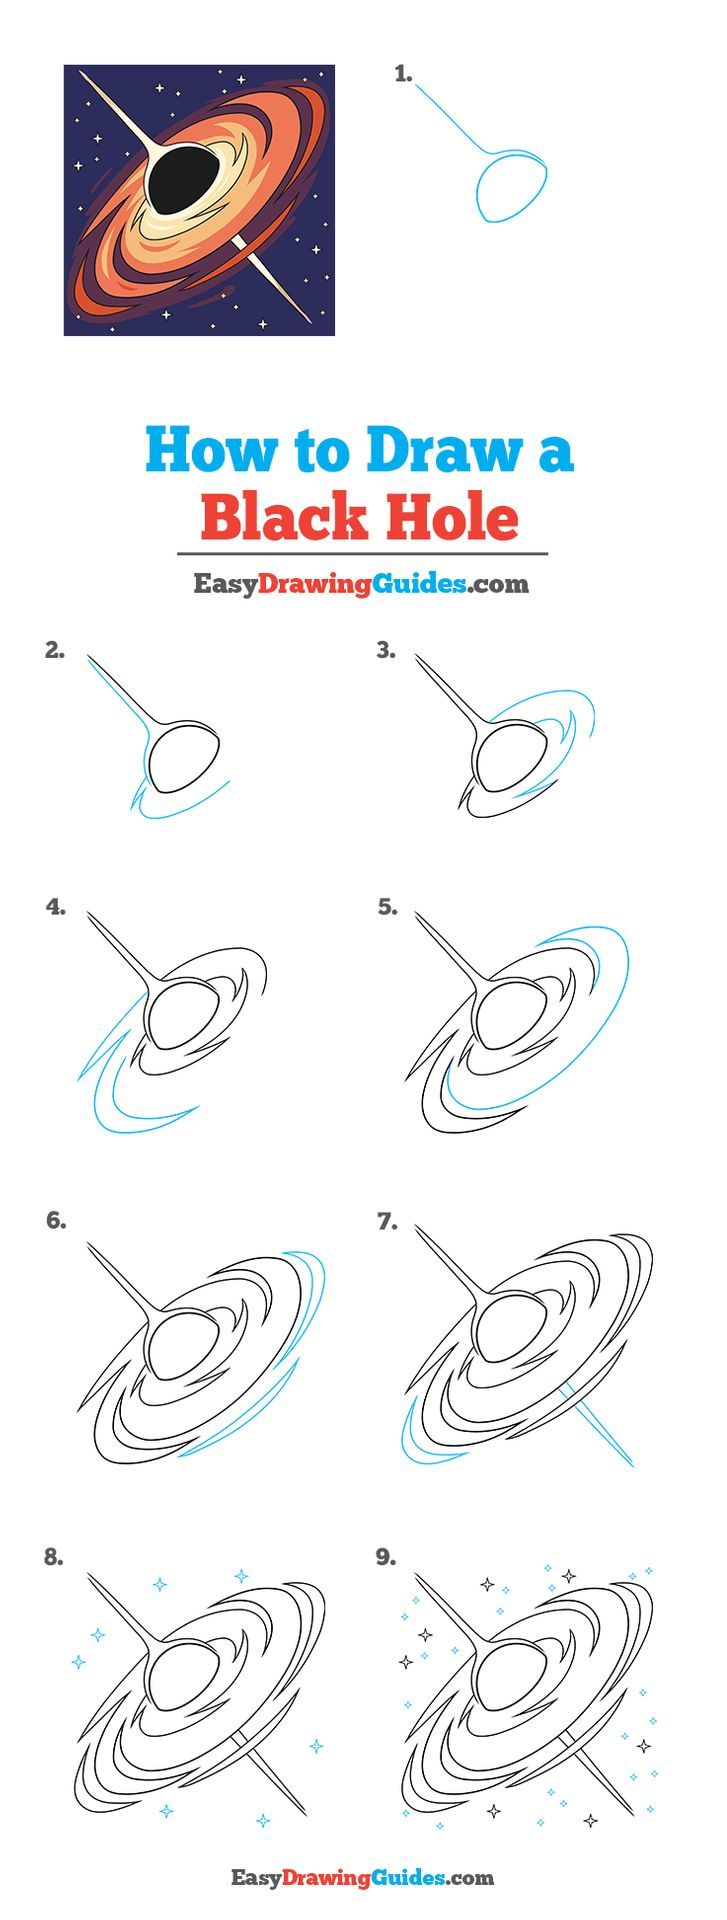


Materials Needed
You'll need a pencil, a eraser, paper, and optionally, some colored pencils or markers for the final touch. That's it! No complex tools required to capture the essence of a black hole.
Understanding Shading
Shading is crucial for creating depth and bringing your black hole to life. It's an interplay of light and dark. Since black holes absorb all light, they're almost always drawn in deep, dark shades. The key is to create a smooth transition from darkest to lightest, simulating a three-dimensional object.


Creating the Basic Shape
Now that we understand the basics, let's start drawing. Begin with a simple circle to represent the black hole's event horizon - the point of no return. Then, add a smaller circle within to represent the singularity, the bottomless pit at a black hole's core.
Unlike other celestial bodies, black holes don't have an outer structure. They're just voids in space, pulling everything in. So, focus on the darkness and the impact they have on their surroundings.
Shading the Event Horizon
Starting from the outer circle, begin shading lightly. Use a simple No. 2 pencil to build depth gradually. Remember, we're creating an illusion of depth here. The further from the center, the lighter the shade. Start from dark, build towards light, and always work from one side to avoid confusing your shading.
Highlighting the Center
Even black holes aren't totally black. They emit a faint glow, known as 'black hole radiation,' which provides an opportunity for a subtle highlight. From the singularity, draw a few small, delicate arcs of light, fanning out like a funnel. These accents will create contrast and make your black hole pop.
Adding Surroundings and Accents
Your black hole now has form and depth. But it's still floating in a void. Let's add some context and bring it to life:
Stars and Galaxies
With a fresh sheet of paper or a new layer, sketch a starry background. Use small, white dots of varying sizes and densities to depict galaxies swirling around your black hole. Around the edges, keep it darker to emphasize the contrast with your illuminated black hole.
Accents of Color
If you're using colored pencils or markers, now's the time to add accents. Black holes are often surrounded by swirling gases and colorful jets of plasma, which can add drama and depth. Choose colors that complement your background and aren't too vibrant to keep the focus on your black hole.
Think about what makes your drawing satisfy you aesthetically. If you're happy with the result, you've drawn a black hole! Every artist's interpretation is unique, and that's the beauty of art. Happy drawing!
Related Articles

Mastering the Black Panther: A Step-by-Step Drawing Guide
Have you ever been captivated by the sleek, powerful lines of a black panther, also known as a black leopard? With their striking black coats and hauntingly...

How to Draw Hulk: Step-by-Step Guide
Ever wondered how to create powerful, dynamic art inspired by the incredible Hulk? Drawing this iconic Marvel character can seem daunting, but with the right...

Learn Fortnite Drawing: Step-by-Step Guide
Are you a Fortnite fan eager to bring your favorite characters and scenes to life? Drawing your favorite Fortnite elements step-by-step might seem daunting...

How to Draw Mountains: Step-by-Step Guide for Beginners
Mountains, these geological giants, have always captivated human imagination. Drawing them might seem daunting, but with the right steps, you can capture their...

Mastering Pencil Techniques: How to Draw Hair Step by Step
Capturing the essence of hair in pencil drawings is an artistic challenge that surpasses the simple act of shading and smudging. The complexity of hair, with...

Easy Mario Drawing Tutorial: Step-by-Step Guide
Ever since Super Mario first jumped onto our screens in 1985, his iconic plumber getup and bold mustache have become instantly recognizable. If you've been...